Compare commits
4 Commits
articles/p
...
taylor-mod
| Author | SHA1 | Date | |
|---|---|---|---|
|
|
c677147c0e | ||
|
|
294e123df7 | ||
|
|
ac4d6a1c98 | ||
|
|
9a5780b66a |
@@ -1,13 +1,13 @@
|
||||
# Change your Email Address
|
||||
|
||||

|
||||

|
||||
|
||||
## What
|
||||
Changing your email address is easy as pie.
|
||||
|
||||
## How
|
||||
1. Hover over your **username** in the top right
|
||||
2. Click on your **Username** in the dropdown menu
|
||||
1. Click on your **username** in the top right
|
||||
2. Click on the **Account** button
|
||||
3. In the **Basic Info** section, replace the email listed with one you would like to change to
|
||||
4. Click **Save** and you’re all done
|
||||
|
||||
|
||||
@@ -1,13 +1,13 @@
|
||||
# Change Your Username
|
||||
|
||||

|
||||

|
||||
|
||||
## What
|
||||
You can change your username at any time
|
||||
|
||||
## How
|
||||
1. Hover over your current **username** in the top right
|
||||
2. Click on your **username** in the dropdown menu
|
||||
1. Click on your current **username** in the top right
|
||||
2. Click on **Account**
|
||||
3. Under **Basic Info**, input a new username
|
||||
4. Click **Save**
|
||||
|
||||
|
||||
@@ -1,6 +1,6 @@
|
||||
# Edit your Profile
|
||||
|
||||

|
||||

|
||||
|
||||
## What
|
||||
In your profile you can edit things like:
|
||||
@@ -12,8 +12,8 @@ In your profile you can edit things like:
|
||||
* Change Password
|
||||
|
||||
## How
|
||||
1. Hover over your **Username** in the top right corner
|
||||
2. Click on your **username** in the dropdown menu
|
||||
1. Select your **Username** in the top right corner
|
||||
2. Click **Account**
|
||||
3. Make your edits in **Basic Info**, then click **Save**
|
||||
* You can also click **Reset** if you would like to start from scratch
|
||||
4. Upload a profile image
|
||||
|
||||
@@ -1,7 +1,9 @@
|
||||
# Manage Your Password
|
||||
|
||||

|
||||
|
||||
## What
|
||||
If you’ve forgotten the password you use to sign in to Stoplight, you can easily reset it at any time.
|
||||
If you’ve forgotten the password you use to sign in to Stoplight; you can easily reset it at any time
|
||||
|
||||
## What
|
||||
1. At the login page, select **Forgot Password?**
|
||||
|
||||
@@ -6,7 +6,7 @@
|
||||
* By default, Stoplight remains open. If you wish to sign out follow these quick and easy steps
|
||||
|
||||
## How
|
||||
1. Hover over your **username** in the top right corner
|
||||
1. Click on your **username** in the top right corner
|
||||
2. In the dropdown menu select **Sign Out**
|
||||
3. All set, come back soon!
|
||||
|
||||
|
||||
@@ -1,90 +0,0 @@
|
||||
# FAQs
|
||||
|
||||
## Personal Billing
|
||||
|
||||
Is my credit card information secure?
|
||||
|
||||
- Yes. All credit card processing is handled through Stripe, and your card information is never sent to, or stored on, our servers.
|
||||
|
||||
What kind of payments do you accept?
|
||||
|
||||
- Through Stripe, we accept any major credit card including American Express, Discover, Mastercard, and Visa.
|
||||
|
||||
Is there a free trial?
|
||||
|
||||
- Yes. Every new account has 14 days to try out the platform.
|
||||
|
||||
When will I be charged?
|
||||
|
||||
- After entering your card details, your card will be charged for the initial 30-day billing cycle.
|
||||
|
||||
Can I upgrade / downgrade anytime?
|
||||
|
||||
- Yes. You can easily adjust your plan and update through the Billing settings.
|
||||
|
||||
How do I cancel my account?
|
||||
|
||||
- To cancel, send an email to support@stoplight.io and we will take care of the rest.
|
||||
|
||||
Do you accept payments other than credit card?
|
||||
|
||||
- Yes. For certain business plans, we can set up a custom net terms plan. Please send an email to support@stoplight.io.
|
||||
|
||||
## Organization Billing
|
||||
|
||||
Is my credit card information secure?
|
||||
|
||||
- Yes. All credit card processing is handled through Stripe, and your card information is never sent to, or stored on, our servers.
|
||||
|
||||
What kind of payments do you accept?
|
||||
|
||||
- Through Stripe, we accept any major credit card including American Express, Discover, Mastercard, and Visa.
|
||||
|
||||
Is there a free trial?
|
||||
|
||||
- Yes. Every new account has 14 days to try out the platform.
|
||||
|
||||
When will I be charged?
|
||||
|
||||
- After entering your card details, your card will be charged for the initial 30-day billing cycle.
|
||||
|
||||
Who counts as a team member vs. a guest?
|
||||
|
||||
- Team members have full functionality while guests only have read-only access.
|
||||
|
||||
Can I upgrade / downgrade anytime?
|
||||
|
||||
- Yes. You can easily adjust your plan and update through the Billing settings.
|
||||
|
||||
How do I cancel my account?
|
||||
|
||||
- To cancel, send an email to support@stoplight.io and we will take care of the rest.
|
||||
|
||||
Do you accept payments other than credit card?
|
||||
|
||||
- Yes. For certain business plans, we can set up a custom net terms plan. Please send an email to support@stoplight.io.
|
||||
|
||||
As I add team members, will my billing automatically adjust?
|
||||
|
||||
- Yes. Once you go past the minimum number of members allotted for your plan, each new member will be added to your monthly bill at a prorated rate.
|
||||
|
||||
Do you have annual pricing?
|
||||
|
||||
- Yes. If you are interested in annual pricing, which comes with a 10% discount, please send an email to support@stoplight.io for more info.
|
||||
|
||||
Can I buy a multi-year subscription?
|
||||
|
||||
- Yes. Please send an email to support@stoplight.io for more info and we can quote a custom plan.
|
||||
|
||||
Do you have any discounts for open source, non-profits. or educational institutions?
|
||||
|
||||
- Yes. Please send an email to support@stoplight.io for more info. To provide the discount, we will ask for more information based on the type of discount.
|
||||
|
||||
|
||||
|
||||
|
||||
|
||||
|
||||
|
||||
|
||||
|
||||
@@ -1,64 +0,0 @@
|
||||
# Organization Plan Overview
|
||||
|
||||

|
||||
## Platform Plans
|
||||
|
||||
### Open Source
|
||||
- Price: Free
|
||||
- Member Max: 5 members
|
||||
- Features:
|
||||
- API Modeling
|
||||
- Documentation
|
||||
- Mocking
|
||||
- Testing
|
||||
- Unlimited Public Projects
|
||||
|
||||
### Team
|
||||
- Price: $29/member/month
|
||||
- Member Minimum: 5 members
|
||||
- Features:
|
||||
- Open Source Plan features + 20 guests
|
||||
- Unlimited Private Projects
|
||||
- Coming Soon: GitHub Integration
|
||||
|
||||
### Business
|
||||
- Price: $59/member/month
|
||||
- Member Minimum: 10 members
|
||||
- Features:
|
||||
- Team features + unlimited guests
|
||||
- SAML single sign-on
|
||||
- Private Slack channel for priority support
|
||||
|
||||
## Documentation Plans
|
||||
|
||||
### Basic
|
||||
- Price: Free
|
||||
- Features:
|
||||
- Unlimited Visits
|
||||
- Publish to .docs.stoplight.io
|
||||
|
||||
|
||||
### Essential
|
||||
- Price: $79/month
|
||||
- Features:
|
||||
- Publish to your domain (1 domain limit)
|
||||
- Theming
|
||||
- Build History & Instant Rollbacks
|
||||
|
||||
### Standard
|
||||
- Price: $179/month
|
||||
- Features:
|
||||
- Publish to your domain (10 domain limit)
|
||||
- Custom CSS
|
||||
- White Label
|
||||
- Basic Auth & Auth0 Integration
|
||||
|
||||
### Pro
|
||||
- Price: $399/month
|
||||
- Features:
|
||||
- Publish to your domain (unlimited domains)
|
||||
- Download static version of docs
|
||||
- SAML single sign-on
|
||||
- OAuth token generation
|
||||
|
||||
|
||||
@@ -1,43 +0,0 @@
|
||||
# Personal Billing Overview
|
||||
|
||||

|
||||
|
||||
## Platform Plans
|
||||
|
||||
### Open Source
|
||||
- Price: Free
|
||||
- Features:
|
||||
- API Modeling
|
||||
- Documentation
|
||||
- Mocking
|
||||
- Testing
|
||||
|
||||
### Developer
|
||||
- Price: $9/month
|
||||
- Features:
|
||||
- Unlimited Private Projects
|
||||
- Coming Soon: Github Integration
|
||||
|
||||
## Documentation Plans
|
||||
|
||||
### Basic
|
||||
- Price: Free
|
||||
- Features:
|
||||
- Unlimited Visits
|
||||
- Publish to .docs.stoplight.io
|
||||
- Docs & OpenAPI Editors
|
||||
|
||||
### Essential
|
||||
- Price: $79/month
|
||||
- Features:
|
||||
- Publish to your Domain (1 domain)
|
||||
- Theming
|
||||
- Build History & Instant Rollbacks
|
||||
|
||||
### Standard
|
||||
- Price: $179/month
|
||||
- Features:
|
||||
- Publish to your Domain (10 domains)
|
||||
- Custom CSS
|
||||
- White Label
|
||||
- Basic Auth & Auth0 Integration
|
||||
|
||||
@@ -1,17 +1,17 @@
|
||||
# Environments
|
||||
|
||||
<!--(FIXME - SHOW CLICKING BETWEEN DIFFERENT ENVIRONMENTS)-->
|
||||
|
||||
An environment is simply a container for data, represented as a list of key-value pairs (behind the scenes, this is a JSON object). Every Stoplight project has one or more environments associated with it. The data stored in an environment can be used in many places within the Stoplight editor.
|
||||
|
||||

|
||||
|
||||
Environments, and their default data, are defined in the [Stoplight configuration file](/platform/editor-basics/editor-configuration).
|
||||
|
||||
* **Do** create an environment for each development environment associated with the project. For example, `development`, `staging`, and `production`.
|
||||
* **Don't** create environments for individual users. Instead, use private variables (below) to customize existing environments.
|
||||
* **Do** use environment default data to store shared information like hostnames, ports, passwords, etc.
|
||||
* **Don't** use environments to store fixture/seed/temporary data.
|
||||
- __Do__ create an environment for each development environment associated with the project. For example, `development`, `staging`, and `production`.
|
||||
- __Don't__ create environments for individual users. Instead, use private variables (below) to customize existing environments.
|
||||
- __Do__ use environment default data to store shared information like hostnames, ports, passwords, etc.
|
||||
- __Don't__ use environments to store fixture/seed/temporary data.
|
||||
|
||||

|
||||
<!--(FIXME - SHOW SCREENSHOT OF THE ENVIRONMENTS WINDOW)-->
|
||||
|
||||
For more information on environment variables and how they can be used during API testing, please
|
||||
see [here](/testing/using-variables/environment).
|
||||
@@ -26,7 +26,7 @@ API keys, and other pieces of sensitive and/or individually specific data.
|
||||
Edit private variables by clicking on the environment button in the top right of the Stoplight editor.
|
||||
|
||||
> Since private variables are only stored on your computer, make sure they are
|
||||
> backed up in a secure location.
|
||||
backed up in a secure location.
|
||||
|
||||
## Resolved Variables
|
||||
|
||||
@@ -44,10 +44,8 @@ For more information on updating and customizing environment variables, please
|
||||
see [here](/platform/editor-basics/editor-configuration).
|
||||
|
||||
---
|
||||
|
||||
**Related Articles**
|
||||
|
||||
* [Working with Files](/platform/editor-basics/working-with-files)
|
||||
* [Change History](/platform/editor-basics/change-history)
|
||||
* [Editor Configuration](/platform/editor-basics/editor-configuration)
|
||||
* [File Validation](/platform/editor-basics/file-validation)
|
||||
- [Working with Files](/platform/editor-basics/working-with-files)
|
||||
- [Change History](/platform/editor-basics/change-history)
|
||||
- [Editor Configuration](/platform/editor-basics/editor-configuration)
|
||||
- [File Validation](/platform/editor-basics/file-validation)
|
||||
|
||||
@@ -1,22 +0,0 @@
|
||||
# Exporting Files
|
||||
|
||||

|
||||
|
||||
## What
|
||||
|
||||
You can export any files in Stoplight to use as you see fit. Exported files are served up in a unique domain in its raw format. Current exported file formats include:
|
||||
|
||||
### YAML
|
||||
- Documentation
|
||||
- Modeling
|
||||
- Testing
|
||||
- Prism
|
||||
- Config
|
||||
|
||||
### Markdown
|
||||
- Markdown
|
||||
|
||||
## How
|
||||
1. Select the **project** that contains the file you wish to export
|
||||
2. Hover over the file you wish to export and click on the **right facing arrow**
|
||||
3. A new tab will open containing your exported file
|
||||
@@ -1,25 +1,26 @@
|
||||
# File Validation
|
||||
|
||||

|
||||
|
||||
File validation is the process of checking a file's syntax and structure to make sure it meets specific requirements. Stoplight's validation ensures file edits are in the correct format. This is especially helpful while editing structured file formats (e.g. OpenAPI documents) so that any errors can be resolved quickly and efficiently.
|
||||
|
||||

|
||||
|
||||
File validation is run after every file edit to make sure no errors were introduced. A notification will appear if validation errors were introduced so that they can be resolved before attempting to save. If a validation error is detected, an alert will appear with an explanation of the issue and where it occurred.
|
||||
|
||||

|
||||
|
||||
Validation failures come in two levels:
|
||||
|
||||
* **Warnings** - A warning is generated if the validation process found a non-critical issue that did not interrupt the processing of the document. As an example, inclusion of non-standard fields in an OpenAPI document will display as a warning.
|
||||
* __Warnings__ - A warning is generated if the validation process found a non-critical issue that did not interrupt the processing of the document. As an example, inclusion of non-standard fields in an OpenAPI document will display as a warning.
|
||||
|
||||
* **Errors** - An error is generated if the validation process found a critical issue that prevented the processing of the document. As an example, not including the correct fields in an OpenAPI document will display as an error.
|
||||
* __Errors__ - An error is generated if the validation process found a critical issue that prevented the processing of the document. As an example, not including the correct fields in an OpenAPI document will display as an error.
|
||||
|
||||
Different types of file validations are used throughout the Stoplight platform. At a high level, file validations aim to identify the following two groups of errors:
|
||||
|
||||
* **Syntax** - Most files stored in Stoplight are either JSON or YAML format, so they must always adhere to the JSON/YAML formatting standards. If anything typed into the editor does not meet the format criteria, it will be rejected with a notification pointing to where the syntax error occurred. _Syntax errors will prevent the file from being saved until all errors are resolved._
|
||||
* __Syntax__ - Most files stored in Stoplight are either JSON or YAML format, so they must always adhere to the JSON/YAML formatting standards. If anything typed into the editor does not meet the format criteria, it will be rejected with a notification pointing to where the syntax error occurred. _Syntax errors will prevent the file from being saved until all errors are resolved._
|
||||
|
||||
* **Correctness** - Certain files stored within Stoplight must adhere to high-level specifications to ensure they are able to be read and processed correctly. The OAS/Swagger specification is one such standard. It is critical that every OAS document stored in Stoplight meet these standards. If an error is detected in any document, either an error or warning will be generated with a description of the issue.
|
||||
* __Correctness__ - Certain files stored within Stoplight must adhere to high-level specifications to ensure they are able to be read and processed correctly. The OAS/Swagger specification is one such standard. It is critical that every OAS document stored in Stoplight meet these standards. If an error is detected in any document, either an error or warning will be generated with a description of the issue.
|
||||
|
||||
---
|
||||
***
|
||||
|
||||
**Related Articles**
|
||||
|
||||
* [Validating Your API Spec](/modeling/modeling-with-openapi/validating-your-api-sec)
|
||||
- [Validating Your API Spec](/modeling/modeling-with-openapi/validating-your-api-sec)
|
||||
|
||||
@@ -1,25 +0,0 @@
|
||||
# Import Files
|
||||
|
||||

|
||||
|
||||
## What
|
||||
|
||||
If you already have existing JSON and markdown, you can import these files into Stoplight.
|
||||
|
||||
### JSON
|
||||
Copy and paste your JSON directly into Stoplight’s Modeling and Testing platforms and it will auto-populate the GUI. Easy peasy lemon squeezy.
|
||||
|
||||
### Markdown
|
||||
Copy and paste your markdown into Stoplight’s Modeling platform to add descriptions to your spec or paste it into Hubs to enhance your documentation.
|
||||
|
||||
## How
|
||||
|
||||
### JSON
|
||||
1. Create a new file or choose an existing one
|
||||
2. Select the **Code View**
|
||||
3. Copy and paste your JSON into the **Code editor**
|
||||
|
||||
### Markdown
|
||||
1. Create a new file or choose an existing one
|
||||
2. Select the **Design View**
|
||||
3. Copy and paste your Markdown into **Text Blocks**
|
||||
@@ -1,6 +1,6 @@
|
||||
# Working with Files
|
||||
|
||||

|
||||

|
||||
|
||||
As part of our effort to make the Stoplight platform more flexible and familiar we added a file explorer to Stoplight Next. You can now see all your files sorted by filetype in one central location within Projects. File types include:
|
||||
|
||||
|
||||
@@ -1,5 +1,7 @@
|
||||
# Organization Owner Introduction
|
||||
|
||||

|
||||
|
||||
## Welcome to Stoplight Next!
|
||||
|
||||
If you are trying to create a new Organization then you are in the right place. Stoplight Next was designed with large scale collaboration and governance as a central principle. The following guide will take you through the process of creating and populating an Organization, and offer an overview of the governance tools within Stoplight Next.
|
||||
|
||||
@@ -8,12 +8,12 @@ Stoplight promotes a design-first philosophy. Developing good design-first pract
|
||||
## API Modeling & Design
|
||||
At Stoplight, everything starts with design. Our visual designer makes it easy for anybody in your organization to model and document APIs, no matter the complexity.
|
||||
|
||||
Whether you have an existing OpenAPI Specification (fka Swagger) or are creating a new API design from scratch, we've got you covered.
|
||||
Whether you have an existing OpenAPI (Swagger) or are creating a new API design from scratch, we've got you covered.
|
||||
|
||||

|
||||
|
||||
## API Testing
|
||||
Once you have your API design / documentation, how do you make sure that it remains accurate over time? Stoplight contract testing, powered by Prism, makes it seamless to create a full suite of tests that apply your API documentation (your contract) to your API. Run these tests from the Stoplight app, and standalone in your CI process or elsewhere.
|
||||
Once you have your API design / documentation, how do you make sure that it remains accurate over time? Stoplight contract testing, powered by Prism, makes it trivial to create a full suite of tests that apply your API documentation (your contract) to your API. Run these tests from the Stoplight app, and standalone in your CI process or elsewhere.
|
||||
|
||||

|
||||
|
||||
|
||||
@@ -1,6 +1,6 @@
|
||||
# Blocks
|
||||
|
||||

|
||||

|
||||
|
||||
## What
|
||||
Blocks are the micro-level building blocks of Hubs. They house multiple forms of content and allow for simple restructuring and modification.
|
||||
|
||||
@@ -1,15 +1,12 @@
|
||||
# Documentation with Hubs
|
||||
|
||||

|
||||
|
||||
Documenting your API is critical to its success. The methods of creation and languages and libraries utilized to create APIs differ dramatically across the API landscape. To ensure that consumers of your API are successful, you must provide robust documentation. To that end, Stoplight has created Hubs, our new documentation editor and generator.
|
||||
Documenting your API is critical to its success. The methods of creation and languages and libraries utilized to create APIs differ dramatically across the API landscape. To ensure that consumers of your API can access it, you must provide robust documentation of its services. To that end, Stoplight has created Hubs, our new documentation editor and generator.
|
||||
|
||||
Hubs allows users to:
|
||||
- Expedite the process of documenting your API
|
||||
- Focus on content instead of design
|
||||
- Host documentation anywhere
|
||||
- Connect your API specification to your documentation
|
||||
- Create non-reference documentation, guides, and tutorials
|
||||
|
||||
## Optimized for Speed
|
||||
- Hubs generates static documentation that gives you near instant load times and can be cached in the browser
|
||||
@@ -19,13 +16,13 @@ Hubs allows users to:
|
||||
|
||||
## Ensures Documentation Accuracy
|
||||
|
||||
One of the most common issues we wanted to solve with Hubs was outdated and incorrect documentation. This occurs because most solutions treat documentation as separate from the API design process. This ultimately leads to out of date documentation due to changes in API specifications not being reflected in documentation. Hubs connects your documentation to your API specification. Whenever you make changes to your API spec, it immediately gets pushed to your documentation, so you never have out of date docs again.
|
||||
One of the most common issues we wanted to solve with Hubs was outdated and incorrect documentation. This occurs because most solutions treat documentation as separate from the API design process. This ultimately leads to out of date documentation due to changes in API specifications not being reflected in documentation. Hubs connects your documentation to your API specification. Whenever you make changes to your API spec, it immediately gets pushed to your documentation, never have out of date docs again.
|
||||
|
||||
|
||||
---
|
||||
**Related Articles**
|
||||
- [Routing](/documentation/getting-started/routing)
|
||||
- [Headers](/documentation/getting-started/header-footer)
|
||||
- [Headers & Footers](/documentation/getting-started/header-footer)
|
||||
- [Pages](/documentation/getting-started/pages)
|
||||
- [Subpages](/documentation/getting-started/subpages)
|
||||
- [Blocks](/documentation/blocks)
|
||||
|
||||
@@ -1,7 +1,7 @@
|
||||
|
||||
# Managing Headers
|
||||
|
||||

|
||||

|
||||
|
||||
## What
|
||||
You can customize the headers of your Hub to add additional navigation to your documentation. You can modify a header's:
|
||||
|
||||
@@ -1,6 +1,6 @@
|
||||
# Pages
|
||||
|
||||

|
||||

|
||||
|
||||
## What
|
||||
Pages are the macro level building blocks of a Hub. They function as the canvas on which all other Hubs objects reside. They are commonly used as a way to separate information based on the broadest topics.
|
||||
@@ -25,7 +25,7 @@ Pages are the macro level building blocks of a Hub. They function as the canvas
|
||||
2. Input a **Page Route** (optional)
|
||||
3. **Power the Page** with an External Data Source (optional)
|
||||
|
||||
|
||||
>Did you know? After creating a new page, a header link will automatically be generated
|
||||
|
||||
---
|
||||
**Related Articles**
|
||||
|
||||
@@ -1,7 +1,5 @@
|
||||
# Publishing
|
||||
|
||||

|
||||
|
||||
## What
|
||||
|
||||
Publishing your documentation has never been easier. Stoplight has added:
|
||||
@@ -37,7 +35,7 @@ Publishing your documentation has never been easier. Stoplight has added:
|
||||
**Related Articles**
|
||||
- [Documentation with Hubs](/documentation/introduction)
|
||||
- [Routing](/documentation/getting-started/routing)
|
||||
- [Headers](/documentation/getting-started/header-footer)
|
||||
- [Headers & Footers](/documentation/getting-started/header-footer)
|
||||
- [Pages](/documentation/getting-started/pages)
|
||||
- [Subpages](/documentation/getting-started/subpages)
|
||||
- [Blocks](/documentation/blocks)
|
||||
|
||||
@@ -1,25 +1,25 @@
|
||||
# Reference Other Sources
|
||||
|
||||

|
||||

|
||||
|
||||
## What
|
||||
Hubs allows you to reference other sources to automatically populate your Hub with content. We call this “powering” a page, subpage, or block. You can power a page, subpage, or block with a markdown or specification file from the current file, a file from the current project, a file from another project, or a file from an external source.
|
||||
Hubs allows you to reference other sources to automatically populate your Hub with content. We call this “powering” a building block. You can power a building block with a file from the current file, a file from the current project, a file from another project, or a file from an external source.
|
||||
|
||||
### What Can I Power
|
||||
|
||||
- Pages
|
||||
- Subpages
|
||||
- Blocks
|
||||
- Text Blocks
|
||||
|
||||
## How
|
||||
|
||||
### Power a Subpage
|
||||
|
||||
1. Select the Hub you wish to modify
|
||||
2. Select **Design** view
|
||||
3. Click on **Page Settings & TOC** at the top of the page
|
||||
1. Select the **page** or **subpage** you wish to power
|
||||
2. Under Page Type, select **Markdown**(for markdown files) or **OpenAPI** (for JSON or YAML files)
|
||||
2. Select (or create a new) **Subpage**
|
||||
3. Click on the **gear icon** in the center of the editor toolbar (If new, this window automatically opens)
|
||||
1. Select **Power this Subpage with an External Data Source**
|
||||
2. Select the data source from the drop-down menu
|
||||
3. Input the specific data source or select from the drop-down menu
|
||||
4. Input an inner data source (optional)
|
||||
4. Click **Confirm**
|
||||
|
||||
@@ -1,7 +1,7 @@
|
||||
|
||||
# Routing
|
||||
|
||||

|
||||

|
||||
|
||||
## What
|
||||
Stoplight’s Hubs features an easy to use routing system to make sure your docs have identifiable and friendly URL’s. The routing system allows customization of the following objects:
|
||||
@@ -9,7 +9,7 @@ Stoplight’s Hubs features an easy to use routing system to make sure your docs
|
||||
- Your Hub
|
||||
- [Pages within a Hub](/documentation/getting-started/pages)
|
||||
- [Subpages within a Hub](/documentation/getting-started/subpages)
|
||||
- [Headers](/documentation/getting-started/header-footer)
|
||||
- [Headers + Footers](/documentation/getting-started/header-footer)
|
||||
- Links
|
||||
|
||||
|
||||
@@ -25,19 +25,19 @@ Stoplight’s Hubs features an easy to use routing system to make sure your docs
|
||||
1. Select a **page title** to auto-fill the **Page Route** or
|
||||
2. Input a **custom page route**
|
||||
3. Select an **existing page** or **subpage**
|
||||
4. Select the **Page Settings & TOC** at the top of the Hub in the center of the page or subpage you wish to modify
|
||||
1. Input a **new URL** under the page path
|
||||
4. Select the **gear icon** at the top of the Hub in the center of the page or subpage you wish to modify
|
||||
1. Input a **new UR**L under Page Route
|
||||
|
||||
### Headers
|
||||
### Headers & Footers
|
||||
|
||||
1. Select the **Hub** you wish to modify
|
||||
2. Click on **Hub Settings** in the top right
|
||||
3. Find the header you wish to modify and input a new route under **Page or Link**
|
||||
|
||||
2. Add a new **[header or footer](/documentation/getting-started/header-footer)** or
|
||||
3. Hover over an existing header or footer and click the **gear icon**
|
||||
a. Input a **Path to Page** or **image URL**
|
||||
|
||||
---
|
||||
**Related Articles**
|
||||
- [Headers](/documentation/getting-started/header-footer)
|
||||
- [Headers & Footers](/documentation/getting-started/header-footer)
|
||||
- [Pages](/documentation/getting-started/pages)
|
||||
- [Subpages](/documentation/getting-started/subpages)
|
||||
|
||||
|
||||
@@ -1,9 +1,9 @@
|
||||
# Subpages
|
||||
|
||||

|
||||

|
||||
|
||||
## What
|
||||
Subpages are the second tier macro building blocks of Hubs. They function as a canvas for blocks and the backbone of navigation. They are commonly used to house content based on a specific topic. Subpages can have more subpages nested underneath them, which gives you lots of flexibility to organize your Hub as you see fit. If a subpage has subpages nested inside of it, it will be displayed as a collapsible group (if it contains content) or a header (if it does not contain content) in the left navigational sidebar.
|
||||
Subpages are the second tier macro building blocks of Hubs. They function as a canvas for blocks. They are commonly used to house content based on a specific topic. Subpages can have more subpages nested underneath them, which gives you lots of flexibility to organize your Hub as you see fit. If a subpage has subpages nested inside of it, it will be displayed as a collapsible group in the left sidebar.
|
||||
|
||||
>Subpages populate the navigational sidebar of a page.
|
||||
|
||||
@@ -11,6 +11,7 @@ Subpages are the second tier macro building blocks of Hubs. They function as a c
|
||||
- Pages
|
||||
- Subpages
|
||||
- Blocks
|
||||
- Header and Footer
|
||||
- Blocks
|
||||
|
||||
## How
|
||||
@@ -18,11 +19,12 @@ Subpages are the second tier macro building blocks of Hubs. They function as a c
|
||||
### Create a New Subpage
|
||||
|
||||
1. Select the Hub you wish to modify
|
||||
2. Select the **design** view
|
||||
3. Hover over **+ Add** and select **Subpage**
|
||||
2. Click on **Toggle Editor**
|
||||
3. Select **+ Subpage** in the editor toolbar
|
||||
1. Input a **Subpage Name**
|
||||
2. Modify the **Subpage Route** (optional)
|
||||
3. **Power the Subpage** with an External Data Source (optional)
|
||||
3. Give the Subpage a **Sidebar Token** (optional)
|
||||
4. **Power the Subpage** with an External Data Source (optional)
|
||||
|
||||
|
||||
>Just like pages, subpages can have blocks. Any blocks added to a subpage will be displayed when a reader navigates to that subpage in your Hub
|
||||
@@ -30,6 +32,6 @@ Subpages are the second tier macro building blocks of Hubs. They function as a c
|
||||
---
|
||||
**Related Articles**
|
||||
- [Routing](/documentation/getting-started/routing)
|
||||
- [Headers](/documentation/getting-started/header-footer)
|
||||
- [Headers & Footers](/documentation/getting-started/header-footer)
|
||||
- [Pages](/documentation/getting-started/pages)
|
||||
- [Publishing](/documentation/publishing)
|
||||
|
||||
@@ -1,30 +1 @@
|
||||
# Theming
|
||||
|
||||

|
||||
|
||||
## What
|
||||
|
||||
Theming brings your API documentation to life. It allows you to easily modify color schemes and add textures to your documentation. There are four different theme settings that can be modified: Primary Color, Secondary Color, Background, and Texture.
|
||||
|
||||
### Primary Color
|
||||
Primary Color applies any color to primary actions and appears only once per page. It modifies objects that you want to draw attention to like buttons.
|
||||
|
||||
### Secondary Color
|
||||
Secondary Color applies any color to other secondary actions. This includes links and active items.
|
||||
|
||||
### Background
|
||||
Background Color applies any color to your header.
|
||||
|
||||
### Texture
|
||||
Texture applies a texture to your header.
|
||||
|
||||
## How
|
||||
1. Select the **Hub** you wish to modify
|
||||
2. Select the **Design View**
|
||||
3. Click on **Settings** at the top of the screen
|
||||
4. Select **Theme** in the sidebar
|
||||
5. Select a pre-selected color or choose your own color with the eyedropper
|
||||
6. Select a texture
|
||||
|
||||
|
||||
|
||||
|
||||
@@ -1,7 +1,5 @@
|
||||
# API Models
|
||||
|
||||

|
||||
|
||||
Models are used to describe common structures in your API design. Use models to
|
||||
describe common structures in your API design. Models help reduce duplication in
|
||||
your API definitions, and increase future maintainability.
|
||||
|
||||
@@ -26,7 +26,7 @@ shared responses.
|
||||
|
||||
## Using the Editor
|
||||
|
||||
|
||||
<!-- FIXME: Insert GIF of using the editor, creating objects, setting their type, etc -->
|
||||
|
||||
We created the CRUD builder editor to make data structure creation as simple as
|
||||
possible. You can find the CRUD builder editor under the **Editor** tab under
|
||||
@@ -87,7 +87,7 @@ If you have a pre-existing JSON document that you would like to convert to a
|
||||
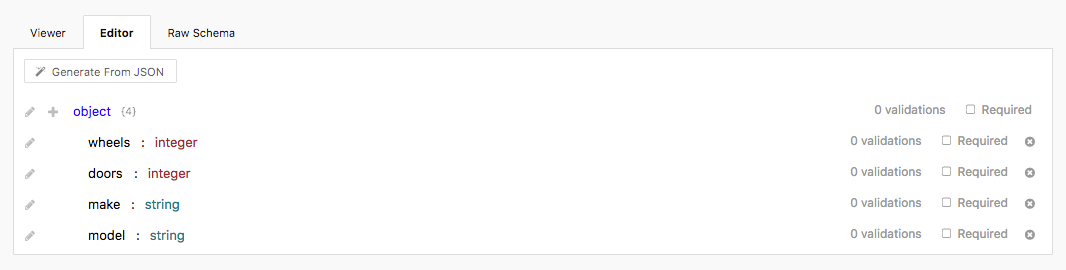
Stoplight data structure, the **Generate from JSON** button available towards
|
||||
the top of the CRUD editor allows you to do just that.
|
||||
|
||||
|
||||
<!-- FIXME: Insert GIF of the generate from json feature -->
|
||||
|
||||
To start:
|
||||
|
||||
@@ -107,7 +107,7 @@ bodies, and shared responses.
|
||||
|
||||
## Editing the Raw JSON Schema
|
||||
|
||||
|
||||
<!-- FIXME: Insert GIF of clicking the 'raw schema' button and editing the json -->
|
||||
|
||||
While not for the faint hearted, you can also edit the raw JSON schema directly
|
||||
if you are familiar with the format, or have a pre-existing JSON schema
|
||||
|
||||
@@ -40,7 +40,7 @@ There are many benefits to using JSON, some of which include:
|
||||
|
||||
* It is a subset of another syntax called
|
||||
[YAML](https://en.wikipedia.org/wiki/YAML). Documents written in JSON can also
|
||||
be written in YAML, so either format can be used to write OpenAPI specifications
|
||||
be written in YAML, so either format can be used to write OpenAPI documents
|
||||
|
||||
* It can be used to link files together through [JSON
|
||||
references](/modeling/introduction/modeling-with-openapi/referencing-another-api-spec), making it easy to break up large documents
|
||||
|
||||
@@ -1,6 +1,6 @@
|
||||
# Modeling Introduction
|
||||
|
||||

|
||||

|
||||
|
||||
## What is API Design?
|
||||
|
||||
@@ -8,7 +8,7 @@ Designing (also known as Modeling) your API involves describing all of the input
|
||||
|
||||
- What are the different resources and operations available in your API?
|
||||
- How does your API authenticate requests?
|
||||
- What are the different data models associated with your service?
|
||||
- What are the different data models assoicated with your service?
|
||||
- How does your API handle errors?
|
||||
|
||||
## How does it fit into Stoplight?
|
||||
@@ -17,15 +17,14 @@ The Stoplight design module is where you and your team will maintain the single
|
||||
|
||||
Once you have your API described in the Stoplight design module, you can:
|
||||
|
||||
- Publish all or part of your API with Hubs
|
||||
- Publish all or part of your API in our Documentation service
|
||||
- Create API tests from your designs
|
||||
- Send requests to your API to debug it
|
||||
- Create a mock API based on your design
|
||||
- ...and much more
|
||||
|
||||
## Getting Started
|
||||
|
||||
There are a few ways to get started designing your API with the Stoplight design module:
|
||||
There are a few ways to get started designing your API with the Stoplight design module, depending on how developed your API is:
|
||||
|
||||
- Create an API from scratch [Using the CRUD Builder](/modeling/modeling-with-openapi/using-the-crud-builder)
|
||||
- [Reference another API Spec](/modeling/modeling-with-openapi/referencing-another-api-spec)
|
||||
|
||||
@@ -42,10 +42,6 @@ different types of vehicles. To begin working on the API, you will need a base
|
||||
"car" model with a few attributes that are common across all vehicles. This
|
||||
might look similar to:
|
||||
|
||||
|
||||
|
||||
The JSON schema will be:
|
||||
|
||||
```javascript
|
||||
// the car base type
|
||||
{
|
||||
@@ -71,14 +67,12 @@ The JSON schema will be:
|
||||
}
|
||||
```
|
||||
|
||||
<!--FIXME Insert image of creating model from UI -->
|
||||
|
||||
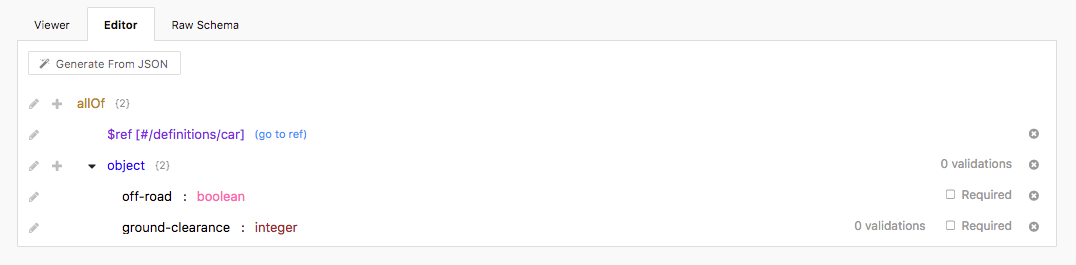
Now that we have a base type model, we now need a derived type that extends the
|
||||
base type. Since we're dealing with cars, let's create a model that defines a
|
||||
SUV type (or a Sport Utility Vehicle):
|
||||
|
||||
|
||||
|
||||
The JSON schema will be:
|
||||
|
||||
```javascript
|
||||
// the SUV model
|
||||
{
|
||||
@@ -105,6 +99,8 @@ The JSON schema will be:
|
||||
}
|
||||
```
|
||||
|
||||
<!--FIXME Insert image of creating derived model in UI -->
|
||||
|
||||
As shown above, by wrapping our SUV model inside of an `allOf` block, we are
|
||||
able to include all of the properties that are included in the car base model
|
||||
above.
|
||||
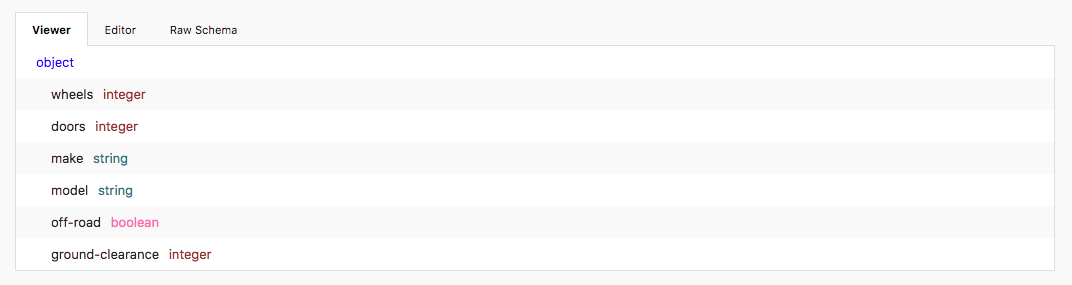
@@ -112,10 +108,6 @@ above.
|
||||
When fully de-referenced (the car reference is replaced with the car
|
||||
properties), the derived SUV model will have the following JSON properties:
|
||||
|
||||
|
||||
|
||||
The JSON schema will be:
|
||||
|
||||
```javascript
|
||||
{
|
||||
"type": "object",
|
||||
@@ -147,12 +139,9 @@ The JSON schema will be:
|
||||
}
|
||||
}
|
||||
```
|
||||
|
||||
---
|
||||
|
||||
**Related Articles**
|
||||
|
||||
* [JSON Introduction](/modeling/json-best-practices/introduction)
|
||||
* [Adding Validations](/modeling/json-best-practices/adding-validations)
|
||||
* [Reducing Duplication with $refs](/modeling/json-best-practices/reducing-duplication-with-refs)
|
||||
* [Generating Schemas](/modeling/json-best-practices/generating-schemas)
|
||||
**Related Articles**
|
||||
- [JSON Introduction](/modeling/json-best-practices/introduction)
|
||||
- [Adding Validations](/modeling/json-best-practices/adding-validations)
|
||||
- [Reducing Duplication with $refs](/modeling/json-best-practices/reducing-duplication-with-refs)
|
||||
- [Generating Schemas](/modeling/json-best-practices/generating-schemas)
|
||||
|
||||
@@ -1,13 +1,13 @@
|
||||
# Referencing Another API Specification
|
||||
|
||||

|
||||
<!-- REFBUILDER GIF/VIDEO-->
|
||||
|
||||
## What
|
||||
|
||||
Referencing another specification allows for cleaner and more organized code. Some use cases are as follows:
|
||||
|
||||
* Generate API documentaion in Hubs
|
||||
* De-duplicate common structures like responses or shared parameters in Modeling
|
||||
* Deduplicate common structures like responses or shared parameters in Modeling
|
||||
* Test a connected API specification in Scenarios
|
||||
* Setup a mock server for an API in Prism
|
||||
|
||||
|
||||
@@ -1,6 +1,6 @@
|
||||
# Sending HTTP Requests
|
||||
|
||||

|
||||
<!---Gif of simple request plus extending spec--->
|
||||
|
||||
## What
|
||||
|
||||
|
||||
@@ -128,7 +128,7 @@ benefit of this approach is that updates to the shared response object are
|
||||
automatically propagated to any endpoint using that object, no extra changes
|
||||
required.
|
||||
|
||||

|
||||

|
||||
|
||||
Shared responses allow you to configure the following properties:
|
||||
|
||||
@@ -140,7 +140,7 @@ Shared responses allow you to configure the following properties:
|
||||
> For more information on the above properties, see the OpenAPI v2 Specification
|
||||
[here](https://github.com/OAI/OpenAPI-Specification/blob/master/versions/2.0.md#responseObject)
|
||||
|
||||

|
||||

|
||||
|
||||
To use a shared response, navigate to an API endpoint's __Response__ section and
|
||||
create a reference to the shared response by choosing the _Type_ of the response
|
||||
@@ -165,7 +165,7 @@ Now that we know what should be returned, let's create a shared response in
|
||||
Stoplight. To get started, create a new shared response for an OpenAPI file
|
||||
under the "Shared" section of the menu.
|
||||
|
||||

|
||||

|
||||
|
||||
As shown in the image above, set the properties for each portion of the response
|
||||
based on our requirements:
|
||||
@@ -179,7 +179,7 @@ based on our requirements:
|
||||
3. The contents of the shared response object based on the three required
|
||||
properties above.
|
||||
|
||||

|
||||

|
||||
|
||||
Once the shared response is created, it can be referenced in any API endpoint by
|
||||
using a _Reference_ type under a response. A shared response can also be used
|
||||
|
||||
@@ -1,6 +1,6 @@
|
||||
# Create An Organization
|
||||
|
||||

|
||||

|
||||
|
||||
## What
|
||||
Organizations are great for grouping people, data, and billing together in one convenient location.
|
||||
|
||||
@@ -1,6 +1,6 @@
|
||||
# Customize Your Organization
|
||||
|
||||

|
||||

|
||||
|
||||
## What
|
||||
|
||||
|
||||
@@ -1,6 +1,6 @@
|
||||
# Delete an Organization
|
||||
|
||||

|
||||

|
||||
|
||||
## What
|
||||
|
||||
|
||||
@@ -1,6 +1,6 @@
|
||||
# Invite People to an Organization
|
||||
|
||||

|
||||

|
||||
|
||||
## What
|
||||
Adding people to your Organization is the first step towards collaboration within Stoplight.
|
||||
|
||||
@@ -1,6 +1,6 @@
|
||||
# Remove People from Your Organization
|
||||
|
||||

|
||||

|
||||
|
||||
## What
|
||||
* Removing a person for your organization is as easy as 123...4...5...6
|
||||
|
||||
@@ -1,6 +1,6 @@
|
||||
# Organization Member Roles and Permissions
|
||||
|
||||

|
||||

|
||||
|
||||
## What
|
||||
Roles and Permissions for members of Organizations can be managed and modified within Stoplight to control access to the Organization's functions and features.
|
||||
|
||||
@@ -1,6 +1,6 @@
|
||||
# Transfer Primary Ownership of Your Organization
|
||||
|
||||

|
||||

|
||||
|
||||
## What
|
||||
You can promote another Member of your Organization to the role of Owner
|
||||
|
||||
@@ -1,4 +1,4 @@
|
||||
# Mocking with Prism
|
||||
# Prism Introduction
|
||||
|
||||
Prism is a performant, dependency free server, built specifically to work with web APIs.
|
||||
|
||||
@@ -35,7 +35,7 @@ prism run --mock --list --spec http://petstore.swagger.io/v2/swagger.json
|
||||
path/to/prism.exe run --mock --list --spec http://petstore.swagger.io/v2/swagger.json
|
||||
```
|
||||
|
||||
Here, you are using the "run" command to run a server based on the spec file passed in via the --spec argument. The spec location can be the filepath to a file on your computer, or the URL to a publicly hosted file. The mock argument tells Prism to mock all incoming requests, instead of forwarding them to the API host described in the spec file. The list argument is a convenience, and tells Prism to print out the endpoints in the spec on startup.
|
||||
Here, you are using the "run" command to run a server based on the spec file passed in via the --spec argument. The spec location can be the filepath to a file on your computer, or the URL to a publicly hosted file. The --mock argument tells Prism to mock all incoming requests, instead of forwarding them to the API host described in the spec file. The --list argument is a convenience, and tells Prism to print out the endpoints in the spec on startup.
|
||||
|
||||
Prism starts on port 4010 by default - try visiting ```http://localhost:4010/v2/pet/findByStatus``` in your browser. This is one of the endpoints described in the petstore spec you passed in. You'll notice that it returns an error about a required query string parameter "status". This is the automatic request validation at work! The swagger spec specifies that a query string parameter names "status" is required for this endpoint so Prism simulates a 400 response for you. Reload the page with a query string parameter, and you will see the dynamically generated mock response ```http://localhost:4010/v2/pet/findByStatus?status=available```.
|
||||
|
||||
|
||||
@@ -1,6 +1,6 @@
|
||||
# Add People to a Team
|
||||
|
||||

|
||||

|
||||
|
||||
## What
|
||||
|
||||
|
||||
@@ -1,6 +1,6 @@
|
||||
# Create a Team
|
||||
|
||||

|
||||

|
||||
|
||||
## What
|
||||
|
||||
|
||||
@@ -1,6 +1,6 @@
|
||||
# Customize a Team
|
||||
|
||||

|
||||

|
||||
|
||||
## What
|
||||
|
||||
|
||||
@@ -1,6 +1,6 @@
|
||||
# Delete a Team
|
||||
|
||||

|
||||

|
||||
|
||||
## What
|
||||
* Want to disband your team? Here's how:
|
||||
|
||||
@@ -1,6 +1,6 @@
|
||||
# Team Member Roles and Permissions
|
||||
|
||||

|
||||

|
||||
|
||||
## What
|
||||
Roles and Permissions for Team members can be managed and modified within Stoplight to control access to the Team’s functions and features.
|
||||
|
||||
@@ -1,6 +1,6 @@
|
||||
# Remove People from a Team
|
||||
|
||||

|
||||

|
||||
|
||||
## What
|
||||
|
||||
|
||||
@@ -1,6 +1,6 @@
|
||||
# Transfer Primary Ownership of a Team
|
||||
|
||||

|
||||

|
||||
|
||||
## What
|
||||
You can transfer Ownership of a Team to another member of the Team.
|
||||
|
||||
@@ -28,7 +28,7 @@ Benefits of contract testing include:
|
||||
|
||||
## Connecting a Spec
|
||||
|
||||

|
||||
<!-- FIXME - Show a gif of selecting spec in coverage screen, and clicking on different endpoints -->
|
||||
|
||||
To get started with contract testing, the first thing you will need to do is
|
||||
generate a scenario from an OpenAPI specification. To get started:
|
||||
@@ -69,7 +69,7 @@ You can use the coverage report to quickly stub out a new scenario. To start:
|
||||
|
||||
## Automatic Contract Test Assertion
|
||||
|
||||

|
||||
<!-- FIXME - Show a gif of running a scenario -->
|
||||
|
||||
After linking your spec to the Scenario Collection, contract test assertions
|
||||
will be automatically added as steps within your scenario.
|
||||
|
||||
@@ -1,8 +1,6 @@
|
||||
# Testing with Scenarios
|
||||
|
||||

|
||||
|
||||
It has become increasingly important to develop highly flexible, performant, and powerful testing roadmaps to catch bugs faster and rapidly iterate. A thorough test suite is essential for:
|
||||
Following the rise of APIs, it has become increasingly important to develop highly flexible, performant, and powerful testing roadmaps to catch bugs faster and rapidly iterate without breaking existing features. A thorough test suite is essential for:
|
||||
- Assessing the health of an API
|
||||
- Providing valuable documentation
|
||||
- Driving design and implementation
|
||||
@@ -18,7 +16,7 @@ APIs require maintenance like any other software. To ensure that your API is fun
|
||||
|
||||
API tests provide insight into how your API behaves under certain scenarios and can drive design if created early enough in the design process. Test/Behavior-driven development (TDD/BDD) encourages you to think about design requirements before writing any code.
|
||||
|
||||
>Stoplight further promotes this design-first principle by providing [Contract Testing](/testing/leveraging-openapi/contract-testing); an integration between your tests and your OpenAPI Specification. This allows for immediate validation and verification that your API responses match the “Contract” specified in your OpenAPI spec.
|
||||
>Stoplight further promotes this design first principle by providing [Contract Testing](/testing/leveraging-openapi/contract-testing); an integration between your tests and your OpenAPI Specification. This allows for immediate validation and verification that your API responses match the “Contract” specified in your OpenAPI spec.
|
||||
|
||||
## Managing Technical Debt
|
||||
|
||||
|
||||
@@ -30,7 +30,7 @@ Once you have created a scenario **step**, use the **Run Step** button to
|
||||
execute that step. The **Run Step** button is available towards the top of the
|
||||
editor, as shown below.
|
||||
|
||||

|
||||

|
||||
|
||||
## Running a Scenario
|
||||
|
||||
@@ -39,7 +39,7 @@ button to execute that scenario. The **Run Scenario** button is available
|
||||
towards the top of the editor while viewing the scenario configuration/overview,
|
||||
as show below.
|
||||
|
||||

|
||||

|
||||
|
||||
|
||||
> Scenarios can also be run directly from every step using the **Run Scenario**
|
||||
@@ -52,7 +52,7 @@ the **Run Collection** button to run the entire collection (including all
|
||||
scenarios and steps). The **Run Collection** button is available towards the top
|
||||
of the editor while viewing the collection home screen, as shown below.
|
||||
|
||||

|
||||

|
||||
|
||||
|
||||
> Collections can also be run from the scenario and step screens using the **Run
|
||||
|
||||
@@ -27,7 +27,7 @@ The Scenario app has a convenient display that gives you the exact command requi
|
||||
|
||||
See below for a screenshot of the "Run From Terminal" command generator. The command in this box will update live in response to environment, user, and scenario changes.
|
||||
|
||||

|
||||
<!-- FIXME: image showing "Run from Terminal" option under a scenario -->
|
||||
|
||||
## Running Scenarios
|
||||
|
||||
|
||||
@@ -25,7 +25,7 @@ scenario. To find this URL:
|
||||
* Within this section is a "Trigger by URL" containing the URL unique to this
|
||||
scenario
|
||||
|
||||

|
||||

|
||||
|
||||
## Triggering Scenarios
|
||||
|
||||
|
||||
@@ -78,7 +78,6 @@ is vital to conduct robust tests to reveal any inconsistencies or defects in
|
||||
the API before it is shipped to a production server or interfaced with other
|
||||
platforms.
|
||||
|
||||

|
||||
### GET
|
||||
|
||||
* Test the GET method to confirm it returns the correct data
|
||||
|
||||
@@ -1,6 +1,8 @@
|
||||
# Using Context Variables
|
||||
|
||||
Context variables allow you to dynamically store and share data between steps in a scenario. Contrary to environment variables, context variables are _not_ saved once a test has completed. Therefore, context variables are only suitable for temporary data.
|
||||
<!--(FIXME - SHOW WRITING VARIABLE TO CONTEXT IN STEP)-->
|
||||
|
||||
Context variables allow you to dynamically store and share data between steps in a scenario. Contrary to environment variables, context variables are _not_ saved once a test has completed. Therefore, context variables are only suitable for temporary data.
|
||||
|
||||
Context variables are scoped to the scenario, _not_ the collection. This means that two scenarios can both read/write the same context variable `myVar`, and not conflict with each other. Environment variables, on the other hand, are shared amongst all scenarios, and are scoped to the collection.
|
||||
|
||||
@@ -10,9 +12,9 @@ At the start of a test run, the context object is empty. Good examples of data t
|
||||
|
||||
Context variables make it possible to chain related steps together. For example, say we have the following set of actions to perform:
|
||||
|
||||
1. Create User, `POST /users`. Returns a new user object, with an `id` property.
|
||||
2. Get User, `GET /users/{$.ctx.userId}`.
|
||||
3. Delete User, `DELETE /users/{$.ctx.userId}`.
|
||||
1. Create User, `POST /users`. Returns a new user object, with an `id` property.
|
||||
2. Get User, `GET /users/{$.ctx.userId}`.
|
||||
3. Delete User, `DELETE /users/{$.ctx.userId}`.
|
||||
|
||||
Somehow we need to use the `id` property for the user created in step #1 to build the request in steps #2 and #3. This is a great case for context variables, since the data is temporary (the new user's id changes every test run, and is only needed in this single scenario).
|
||||
|
||||
@@ -22,14 +24,16 @@ To accomplish this, we would capture/set the `$.ctx.userId` property to `output.
|
||||
|
||||
### With Captures
|
||||
|
||||
The capture UI in the step editor makes it easy to set `$.ctx` values. You can use values from the step output or input, including headers, response bodies, etc.
|
||||
<!--(FIXME - SHOW USING THE CAPTURE MENU IN A SCENARIO STEP)-->
|
||||
|
||||

|
||||
The capture UI in the step editor makes it easy to set `$.ctx` values. You can use values from the step output or input, including headers, response bodies, etc.
|
||||
|
||||
> Multiple captures can be applied to the same step, to set multiple `$.ctx` values.
|
||||
|
||||
### With Scripting
|
||||
|
||||
<!--(FIXME - SHOW SCREENSHOT OF SCRIPT IN STEP)-->
|
||||
|
||||
Scripting allows you to use more complicated logic in a scenario step. Scripts
|
||||
are executed either before or after a step request finishes. Scripts are plain
|
||||
Javascript and give you direct access to the scenario context through the global
|
||||
@@ -44,7 +48,7 @@ $.ctx.set('userId', output.body.get('id'));
|
||||
|
||||
Where the `$.ctx.set(x, y)` function adds the data referenced in the second
|
||||
argument (`y`) to the context under the string value of the first argument
|
||||
(`x`).
|
||||
(`x`).
|
||||
|
||||
Here is another example that just sets `myVariable` to the hardcoded value `123`:
|
||||
|
||||
@@ -54,6 +58,8 @@ $.ctx.set('myVariable', 123);
|
||||
|
||||
## Using Context Variables
|
||||
|
||||
<!--(FIXME - SHOW USING A CONTEXT VARIABLE IN A SCENARIO STEP)-->
|
||||
|
||||
To use a context variable in a scenario, use the following syntax:
|
||||
|
||||
```
|
||||
@@ -85,8 +91,10 @@ Where the braces (`{}`) are absent, and we are using the `get()` method for
|
||||
retrieving the context variable under the `myVariable` key.
|
||||
|
||||
---
|
||||
|
||||
**Related Articles**
|
||||
- [Using Variables Overview](/testing/using-variables/overview)
|
||||
- [$$.env (Environment)](/testing/using-variables/environment)
|
||||
|
||||
|
||||
|
||||
|
||||
* [Using Variables Overview](/testing/using-variables/overview)
|
||||
* [$$.env (Environment)](/testing/using-variables/environment)
|
||||
|
||||
@@ -1,15 +1,15 @@
|
||||
# Using Environment Variables
|
||||
|
||||
<!--(FIXME - SHOW CLICKING THROUGH ENVIRONMENTS IN UI)-->
|
||||
|
||||
> If you have not already done so, we recommend reviewing the
|
||||
> [Environments](/platform/editor-basics/environments) article before continuing.
|
||||
[Environments](/platform/editor-basics/environments) article before continuing.
|
||||
|
||||
Environment variables in Stoplight allow you to dynamically retrieve information
|
||||
in a scenario from the active environment. This makes it possible to
|
||||
switch between different environments with ease, having variables automatically
|
||||
populate based on the current environment.
|
||||
|
||||

|
||||
|
||||
## Setting Environment Variables
|
||||
|
||||
### With the Editor Configuration
|
||||
@@ -23,8 +23,8 @@ Captures make it easy to "capture" values from your step request or result, and
|
||||
Say you have a scenario step that sends an HTTP request to authenticate a new user. The response from that request includes an apiKey that you want to use for other requests. You can easily save that apiKey to an environment variable, for later re-use, by adding a capture in the form `$$.env.apiKey = output.body.apiKey`. After running the step, check your current environment variables and note the newly added apiKey!
|
||||
|
||||
> Environment variables set via captures are only added to the user's private
|
||||
> variables, and are not sent to Stoplight. See the [Environment
|
||||
> section](/platform/editor-basics/environments) for more information.
|
||||
variables, and are not sent to Stoplight. See the [Environment
|
||||
section](/platform/editor-basics/environments) for more information.
|
||||
|
||||
### With Scripting
|
||||
|
||||
@@ -45,11 +45,13 @@ argument (`y`) to the environment under the string value of the first argument
|
||||
(`x`).
|
||||
|
||||
> Environment variables set via script are only added to the user's private
|
||||
> variables, and are not sent to Stoplight. See the [Environment
|
||||
> section](/platform/editor-basics/environments) for more information.
|
||||
variables, and are not sent to Stoplight. See the [Environment
|
||||
section](/platform/editor-basics/environments) for more information.
|
||||
|
||||
## Using Environment Variables
|
||||
|
||||
<!--(FIXME - SHOW USING A VARIABLE IN A SCENARIO STEP)-->
|
||||
|
||||
Use an environment variable in a scenario with the following syntax:
|
||||
|
||||
```
|
||||
@@ -81,11 +83,10 @@ $$.env.get('myVariable');
|
||||
Where the braces (`{}`) are absent, and we are using the `get()` method for
|
||||
retrieving the environment variable under the `myVariable` key.
|
||||
|
||||
---
|
||||
|
||||
***
|
||||
**Related Articles**
|
||||
- [Editor Configuration](/platform/editor-basics/editor-configuration)
|
||||
- [Environments](/platform/editor-basics/environments)
|
||||
- [Using Variables Overview](/testing/using-variables/overview)
|
||||
- [$.ctx(Context)](/testing/using-variables/context)
|
||||
|
||||
* [Editor Configuration](/platform/editor-basics/editor-configuration)
|
||||
* [Environments](/platform/editor-basics/environments)
|
||||
* [Using Variables Overview](/testing/using-variables/overview)
|
||||
* [$.ctx(Context)](/testing/using-variables/context)
|
||||
|
||||
BIN
assets/gifs/Blocks.gif
Normal file
|
After Width: | Height: | Size: 22 MiB |
|
Before Width: | Height: | Size: 1.1 MiB After Width: | Height: | Size: 2.8 MiB |
|
Before Width: | Height: | Size: 871 KiB |
|
Before Width: | Height: | Size: 337 KiB |
|
Before Width: | Height: | Size: 847 KiB |
BIN
assets/gifs/create-pages.gif
Normal file
|
After Width: | Height: | Size: 22 MiB |
BIN
assets/gifs/create-subpages.gif
Normal file
|
After Width: | Height: | Size: 20 MiB |
|
Before Width: | Height: | Size: 1.2 MiB |
|
Before Width: | Height: | Size: 564 KiB |
|
Before Width: | Height: | Size: 849 KiB |
|
Before Width: | Height: | Size: 2.8 MiB After Width: | Height: | Size: 5.8 MiB |
|
Before Width: | Height: | Size: 2.0 MiB After Width: | Height: | Size: 8.3 MiB |
|
Before Width: | Height: | Size: 948 KiB After Width: | Height: | Size: 14 MiB |
|
Before Width: | Height: | Size: 1.3 MiB After Width: | Height: | Size: 6.2 MiB |
|
Before Width: | Height: | Size: 3.0 MiB After Width: | Height: | Size: 14 MiB |
|
Before Width: | Height: | Size: 2.5 MiB After Width: | Height: | Size: 6.7 MiB |
BIN
assets/gifs/fileexplorer.gif
Normal file
|
After Width: | Height: | Size: 17 MiB |
|
Before Width: | Height: | Size: 767 KiB |
|
Before Width: | Height: | Size: 4.9 MiB After Width: | Height: | Size: 18 MiB |
|
Before Width: | Height: | Size: 626 KiB |
|
Before Width: | Height: | Size: 1.4 MiB |
|
Before Width: | Height: | Size: 1.2 MiB |
|
Before Width: | Height: | Size: 1.2 MiB |
|
Before Width: | Height: | Size: 1.2 MiB |
|
Before Width: | Height: | Size: 2.3 MiB |
|
Before Width: | Height: | Size: 307 KiB |
|
Before Width: | Height: | Size: 1.2 MiB |
|
Before Width: | Height: | Size: 850 KiB |
|
Before Width: | Height: | Size: 673 KiB |
BIN
assets/gifs/org-create.gif
Normal file
|
After Width: | Height: | Size: 7.0 MiB |
|
Before Width: | Height: | Size: 340 KiB |
|
Before Width: | Height: | Size: 487 KiB |
|
Before Width: | Height: | Size: 496 KiB |
BIN
assets/gifs/org-member-remove.gif
Normal file
|
After Width: | Height: | Size: 4.9 MiB |
|
Before Width: | Height: | Size: 368 KiB |
|
Before Width: | Height: | Size: 587 KiB |
BIN
assets/gifs/org-settings.gif
Normal file
|
After Width: | Height: | Size: 2.1 MiB |
|
Before Width: | Height: | Size: 437 KiB |
BIN
assets/gifs/org-transfer.gif
Normal file
|
After Width: | Height: | Size: 3.4 MiB |
|
Before Width: | Height: | Size: 2.2 MiB After Width: | Height: | Size: 8.0 MiB |
|
Before Width: | Height: | Size: 434 KiB |
|
Before Width: | Height: | Size: 1.0 MiB |
|
Before Width: | Height: | Size: 1.7 MiB After Width: | Height: | Size: 4.1 MiB |
|
Before Width: | Height: | Size: 2.1 MiB After Width: | Height: | Size: 4.3 MiB |