Compare commits
4 Commits
articles/t
...
jason/revi
| Author | SHA1 | Date | |
|---|---|---|---|
|
|
3e7beb0b9e | ||
|
|
38675fab3c | ||
|
|
dfd07af634 | ||
|
|
c95c8b1011 |
@@ -1,44 +1,42 @@
|
||||
# Polymorphic Objects
|
||||
# Polymorphic Objects
|
||||
|
||||
## What
|
||||
## What
|
||||
|
||||
- Resources in your API are polymorphic. They can be returned as XML or JSON and can have a flexible amount of fields. You can also have requests and responses in your API design that can be depicted by a number of alternative schemas.
|
||||
- **Polymorphism** is the capacity to present the same interface for differing underlying forms.
|
||||
- The **discriminator** keyword is used to designate the name of the property that decides which schema definition validates the structure of the model.
|
||||
* Resources in your API are polymorphic. They can be returned as XML or JSON and can have a flexible amount of fields. You can also have requests and responses in your API design that can be depicted by a number of alternative schemas.
|
||||
* **Polymorphism** is the capacity to present the same interface for differing underlying forms.
|
||||
* The **discriminator** keyword is used to designate the name of the property that decides which schema definition validates the structure of the model.
|
||||
|
||||
## Why
|
||||
- Polymorphism permits combining and extending model definitions.
|
||||
## Why
|
||||
|
||||
* Polymorphism permits combining and extending model definitions.
|
||||
|
||||
## Best Practices
|
||||
|
||||
<!-- theme: warning -->
|
||||
>The discriminator property **must** be a mandatory or required field. When it is used, the value **must** be the name of the schema or any schema that inherits it.
|
||||
|
||||
### Example
|
||||
> The discriminator property **must** be a mandatory or required field. When it is used, the value **must** be the name of the schema or any schema that inherits it.
|
||||
|
||||
```
|
||||
{
|
||||
definitions:
|
||||
### Example
|
||||
|
||||
```yaml
|
||||
definitions:
|
||||
Vehicle:
|
||||
type: object,
|
||||
discriminator: brand
|
||||
type: object,
|
||||
discriminator: model
|
||||
properties:
|
||||
model:
|
||||
type: string
|
||||
color:
|
||||
type: string
|
||||
required:
|
||||
model
|
||||
|
||||
Sedan: # Sedan is used as the discriminator value
|
||||
|
||||
required:
|
||||
-model
|
||||
Sedan: # If Vehicle.model is Sedan then use Sedan model for validation.
|
||||
allOf:
|
||||
$ref: '#/definitions/Vehicle'
|
||||
type: object
|
||||
properties:
|
||||
dateManufactured:
|
||||
type: date
|
||||
required:
|
||||
dateManufactured
|
||||
}
|
||||
- $ref: '#/definitions/Vehicle'
|
||||
- type: object
|
||||
properties:
|
||||
dateManufactured:
|
||||
type: date
|
||||
required:
|
||||
- dateManufactured
|
||||
```
|
||||
|
||||
30
articles/testing/assertions.md
Normal file
30
articles/testing/assertions.md
Normal file
@@ -0,0 +1,30 @@
|
||||
# Assertions
|
||||
|
||||
## What is an Assertion?
|
||||
|
||||
- An API test consists of a series of steps (these are sometimes HTTP requests) that can be executed collectively or individually.
|
||||
- An **assertion** is a specification that indicates the expected outcome (response) to a request executed in a test.
|
||||
- A test is unsuccesful if an assertion fails i.e. the actual outcome is not equal to the expected outcome
|
||||
- You can create assertions for status codes, response time, reponse content, header values, etc.
|
||||
- When you execute an assertion, you can determine the type of operation you want to perform with your expected outcomes.
|
||||
|
||||
### Comparison Logic Available in Scenarios
|
||||
- equals
|
||||
- greater than
|
||||
- greater than or equals
|
||||
- less than
|
||||
- less than or equals
|
||||
- no equal
|
||||
- exists
|
||||
- length equals
|
||||
- contains
|
||||
- validate pass
|
||||
- validate fail
|
||||
|
||||
## Why
|
||||
- Assertions are checked any time a test is executed.
|
||||
- Assertions are used to detemine the state of a test (pass or fail).
|
||||
- Assertions are ideal for discovering if an API satisfies stipulated objectives.
|
||||
|
||||
## Assertions in Scenarios
|
||||
- Scenarios in Stoplight are grouped into collections. To create an assertion for a step in Scenarios, you need to create a collection and add your Scenarios to it.
|
||||
20
articles/testing/authorization.md
Normal file
20
articles/testing/authorization.md
Normal file
@@ -0,0 +1,20 @@
|
||||
# Authorization
|
||||
|
||||
## What is Authorization?
|
||||
|
||||
- **Authentication** is the process of verifying if a user or API consumer can have access to an API.
|
||||
- **Authorization** defines the resources an authenticated (properly identified) user can access. For example, a user might be authorized to use an endpoint for retrieving results but denied access to the endpoint for updating a data store.
|
||||
- Authentication strategies can be implemented using basic HTTP authentication or OAuth methods. Authorization can be implemented using roles and claims.
|
||||
|
||||
## Authentication Schemes
|
||||
- **Basic Authentication** is easy to implement and utilizes HTTP headers to validate API consumers. While the credentials might be encoded, they are not encrypted. It is advisable to use this method over HTTPS/SSL.
|
||||
- **OAuth 1.0** has its foundation in cryptography. Digital signatures are used to authenticate and ensure the data originates from an expected source. It can be used with or without SSL.
|
||||
- While OAuth 1.0 works primarily with web clients, **OAuth 2.0** works with web and non-web clients. OAuth 2.0 is easy to implement and focuses on bearer tokens. It wokrs with HTTPS/SSL for its security requirement.
|
||||
- **AWS Signature** is a secutiry protocol that defines authentication information added to AWS requests. It consists of an access key ID and a security access key. Users who generate manual HTTP requests to AWS are required to sign the requests using AWS Signature. [Click here to learn more about AWS Signature](https://docs.aws.amazon.com/AmazonS3/latest/API/sig-v4-authenticating-requests.html)
|
||||
|
||||
## Best Practices for Authentication and Authorization when Testing APIs
|
||||
|
||||
- Use the same authentication and authorization your users would use during testing. Doing so will help you effectively identify and resolve issues users might face in a live scenario.
|
||||
- Avoid creating too many test accounts with administrative access to all endpoints and resources during your test phase. It can be exploited, putting your resources and data at risk when the API is avaialble to consumers.
|
||||
- Use ecryption to store valid IDs and credentials. Ensure test procedures containing valid user IDs or tokens are not displayed as unmasked text in test results or test logs.
|
||||
- Test your authentication and authorization procedures rigorously by attempting to access secured resources with invalid credentials or session tokens or by atttempting to access a resource denied to an authenticated user.
|
||||
@@ -1,75 +1 @@
|
||||
# Pass Data Between Steps
|
||||
|
||||
Most scenarios will involve more than one step, and oftentimes you will need to share data between steps.
|
||||
|
||||
For example, imagine a simple scenario that tests the CRUD operations on a "todos" model. It might involve 5 steps:
|
||||
|
||||
1. CREATE /todos
|
||||
2. GET /todos/{todoId}
|
||||
3. PUT /todos/{todoId}
|
||||
4. DELETE /todos/{todoId}
|
||||
5. GET /todos/{todoId} (to make sure 404 not found)
|
||||
|
||||
In order for this to work, steps 2-5 need to be able to access the `id` of the newly created todo in step 1. To do this, we'll save the new `id` property in step 1 to the $.ctx object.
|
||||
|
||||
### The $.ctx object
|
||||
|
||||
The $.ctx object makes it easy to store temporary data for use during the course of a single scenario run. By default, the $.ctx object will be empty at the start of every run. Use it to share data between steps.
|
||||
|
||||
### Using the $.ctx object
|
||||
|
||||
To use a ctx variable in your scenario, simply use the {$.ctx.variableName} syntax. For example, if your ctx variable is called `todoId`, and you want to use it in your step's URL, you would do something like this:
|
||||
|
||||
`/todos/{$.ctx.todoId}`
|
||||
|
||||
When the step is run, `{$.ctx.todoId}` will be replaced by whatever $.ctx.todoId has been set to in a previous step.
|
||||
|
||||
You can use variables anywhere in your step, including url, auth, headers, request body, assertions, captures, and scripting.
|
||||
|
||||
To use environments in a before script, after script, or step with type script:
|
||||
|
||||
```js
|
||||
// would print the postId
|
||||
console.log($.ctx.get('todoId');
|
||||
```
|
||||
|
||||
In the screenshot below, we are using a `todoId` ctx variable that is set in a previous step. It is helping us create the URL, and is also used in a test assertion to make sure that the API request responds with the exact id we are requesting.
|
||||
|
||||

|
||||
|
||||
### Setting ctx variables
|
||||
|
||||
#### With Captures
|
||||
|
||||
Save values from your step to your ctx object, for use in subsequent steps.
|
||||
|
||||
To accomplish this, open up the Captures tab of one of your steps and select $.ctx on the lefthand side of the assignment. In the image below we are saving the todoId property of the Create Todo response back to a variable on our ctx called `todoId`. We will use this variable in subsequent steps.
|
||||
|
||||

|
||||
|
||||
#### With Scripting
|
||||
|
||||
When you need more complicated conditional logic or processing, scripting is the way to go. Scripts are plain javascript, and give you access to the $.ctx object. You can achieve the same results as the capture screenshot above as seen in the screenshot below.
|
||||
|
||||

|
||||
|
||||
### When to use ctx variables
|
||||
|
||||
You can think of ctx variables as a temporary state in your scenario. In general, we recommend using them for values that are created during the course of a single scenario that need to be shared with subsequent steps. This includes things like ids, usernames, and randomly generated tokens.
|
||||
|
||||
<!-- theme: warning -->
|
||||
> We do **NOT** recommend using ctx variables for more permanent values that need to persist across scenario runs. For this persisted value use case, we recommend using the $$.env object, which is explained in detail [here](variables-environment.md).
|
||||
|
||||
### Debugging ctx variables
|
||||
|
||||
$.ctx variables can be manually set when running a step. This is useful if you are trying to debug a single step in the middle of a scenario that relies on a ctx value set in a previous step. Instead of running the entire scenario to generate the needed ctx value, you can set it in the UI manually. In the screenshot below, we can set the todoId ctx variable before running the step to debug what would happen with a particular todoId value.
|
||||
|
||||

|
||||
|
||||
---
|
||||
|
||||
**Related**
|
||||
|
||||
* [Variables Overview](variables-overview.md)
|
||||
* [Context Variables](variables-context.md)
|
||||
* [Variables Environment](variables-environment.md)
|
||||
|
||||
@@ -1,29 +1 @@
|
||||
# Scenario References
|
||||
|
||||
References are a special type of step that allow you to include other scenarios in your scenario. This is a very powerful concept that can dramatically reduce the duplication in your scenarios.
|
||||
|
||||
To reference another scenario, add a step to an existing scenario and change it's type from "HTTP/Script" to "REF". This will expose a dropdown that lists all of the scenarios in your collection. Select a value from the dropdown to create the ref to that scenario.
|
||||
|
||||
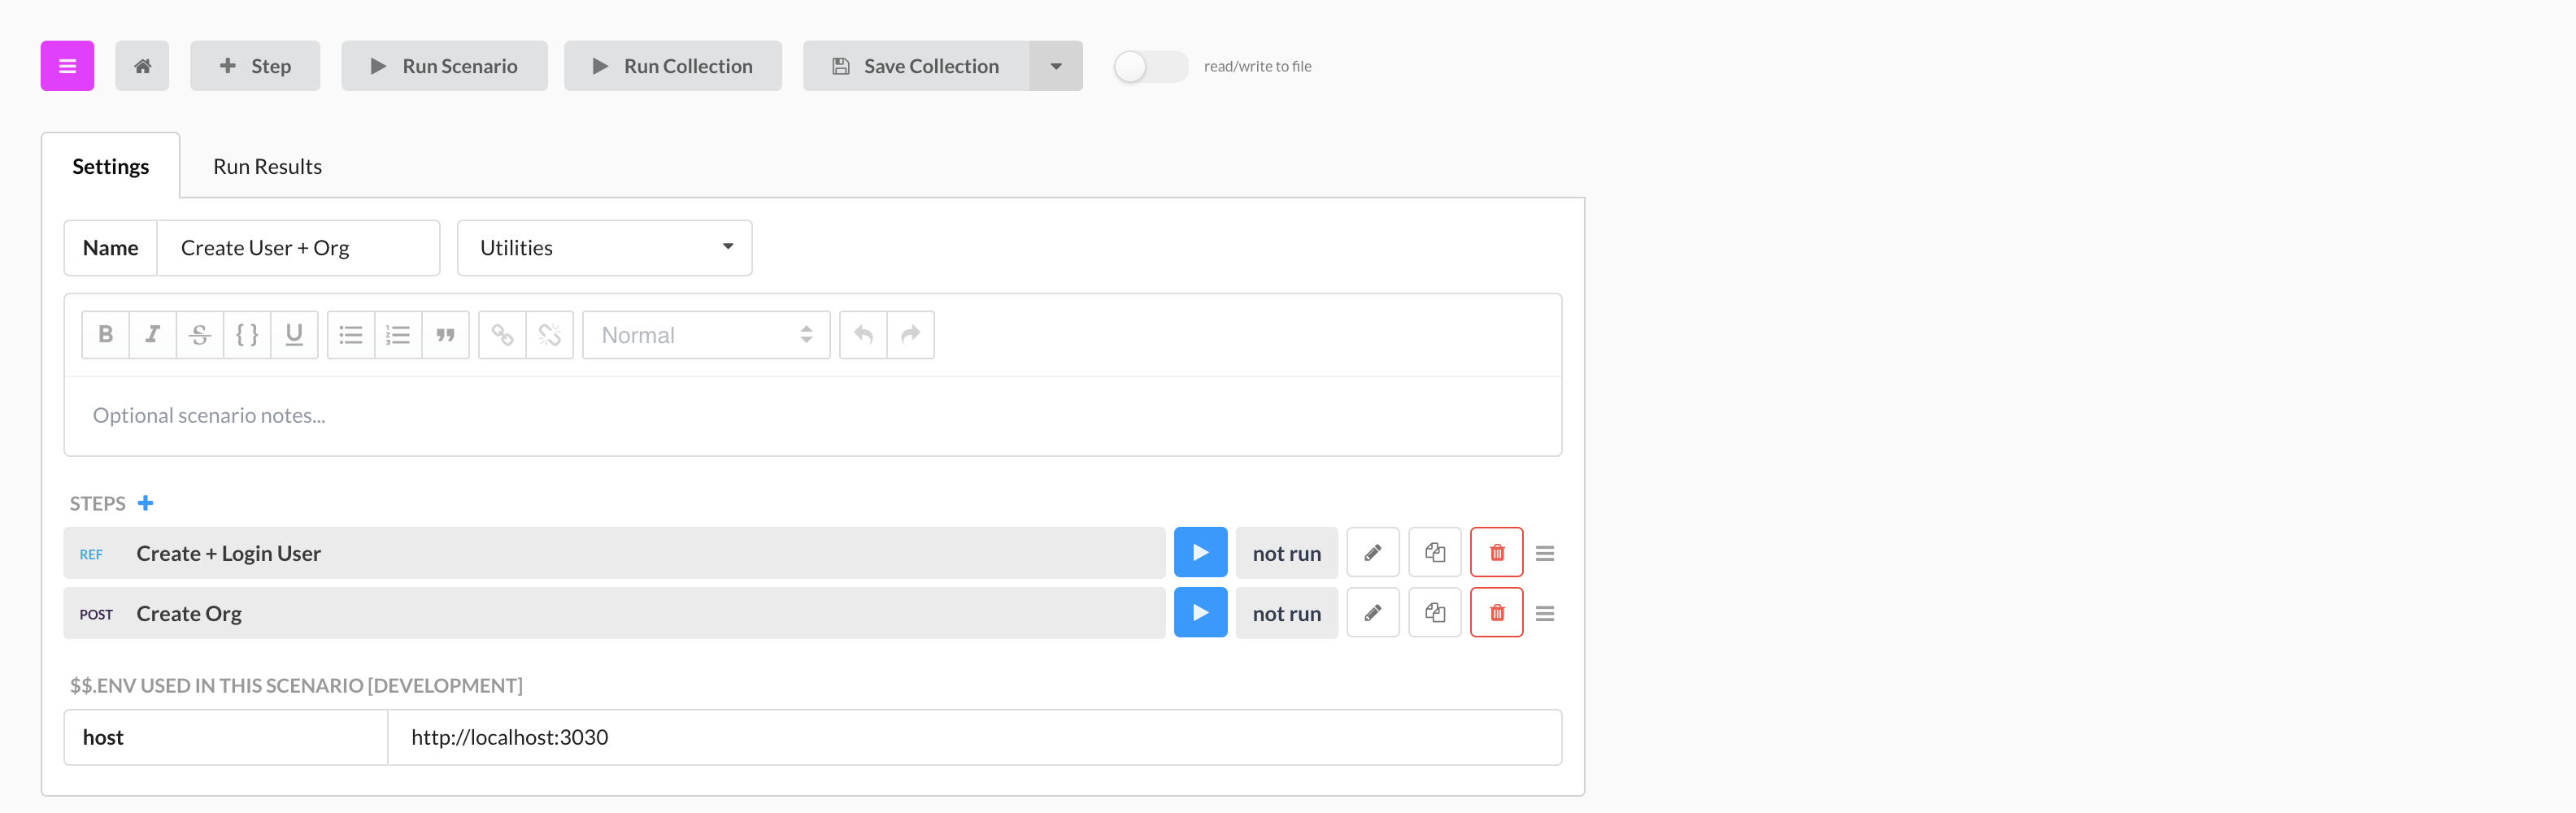
In the screenshot below, [Todo: Utility CRUD](https://next.stoplight.io/stoplight/hub/blob/master/tests.scenarios.yml?edit=%23%2Fscenarios%2Ftodo-utility) and [User: Utility CRUD](https://next.stoplight.io/stoplight/hub/blob/master/tests.scenarios.yml?edit=%23%2Fscenarios%2Fuser-utility) scenario have one step that refrences [Entity CRUD](https://next.stoplight.io/stoplight/hub/blob/master/tests.scenarios.yml?edit=%23%2Futilities%2Fcrud) from Utilities. Entity CRUD does all the heavy lifting: it CREATES, GETS, UPDATES, DELETES, and repeats GETS (To verify entity was deleted) an entity.
|
||||
|
||||
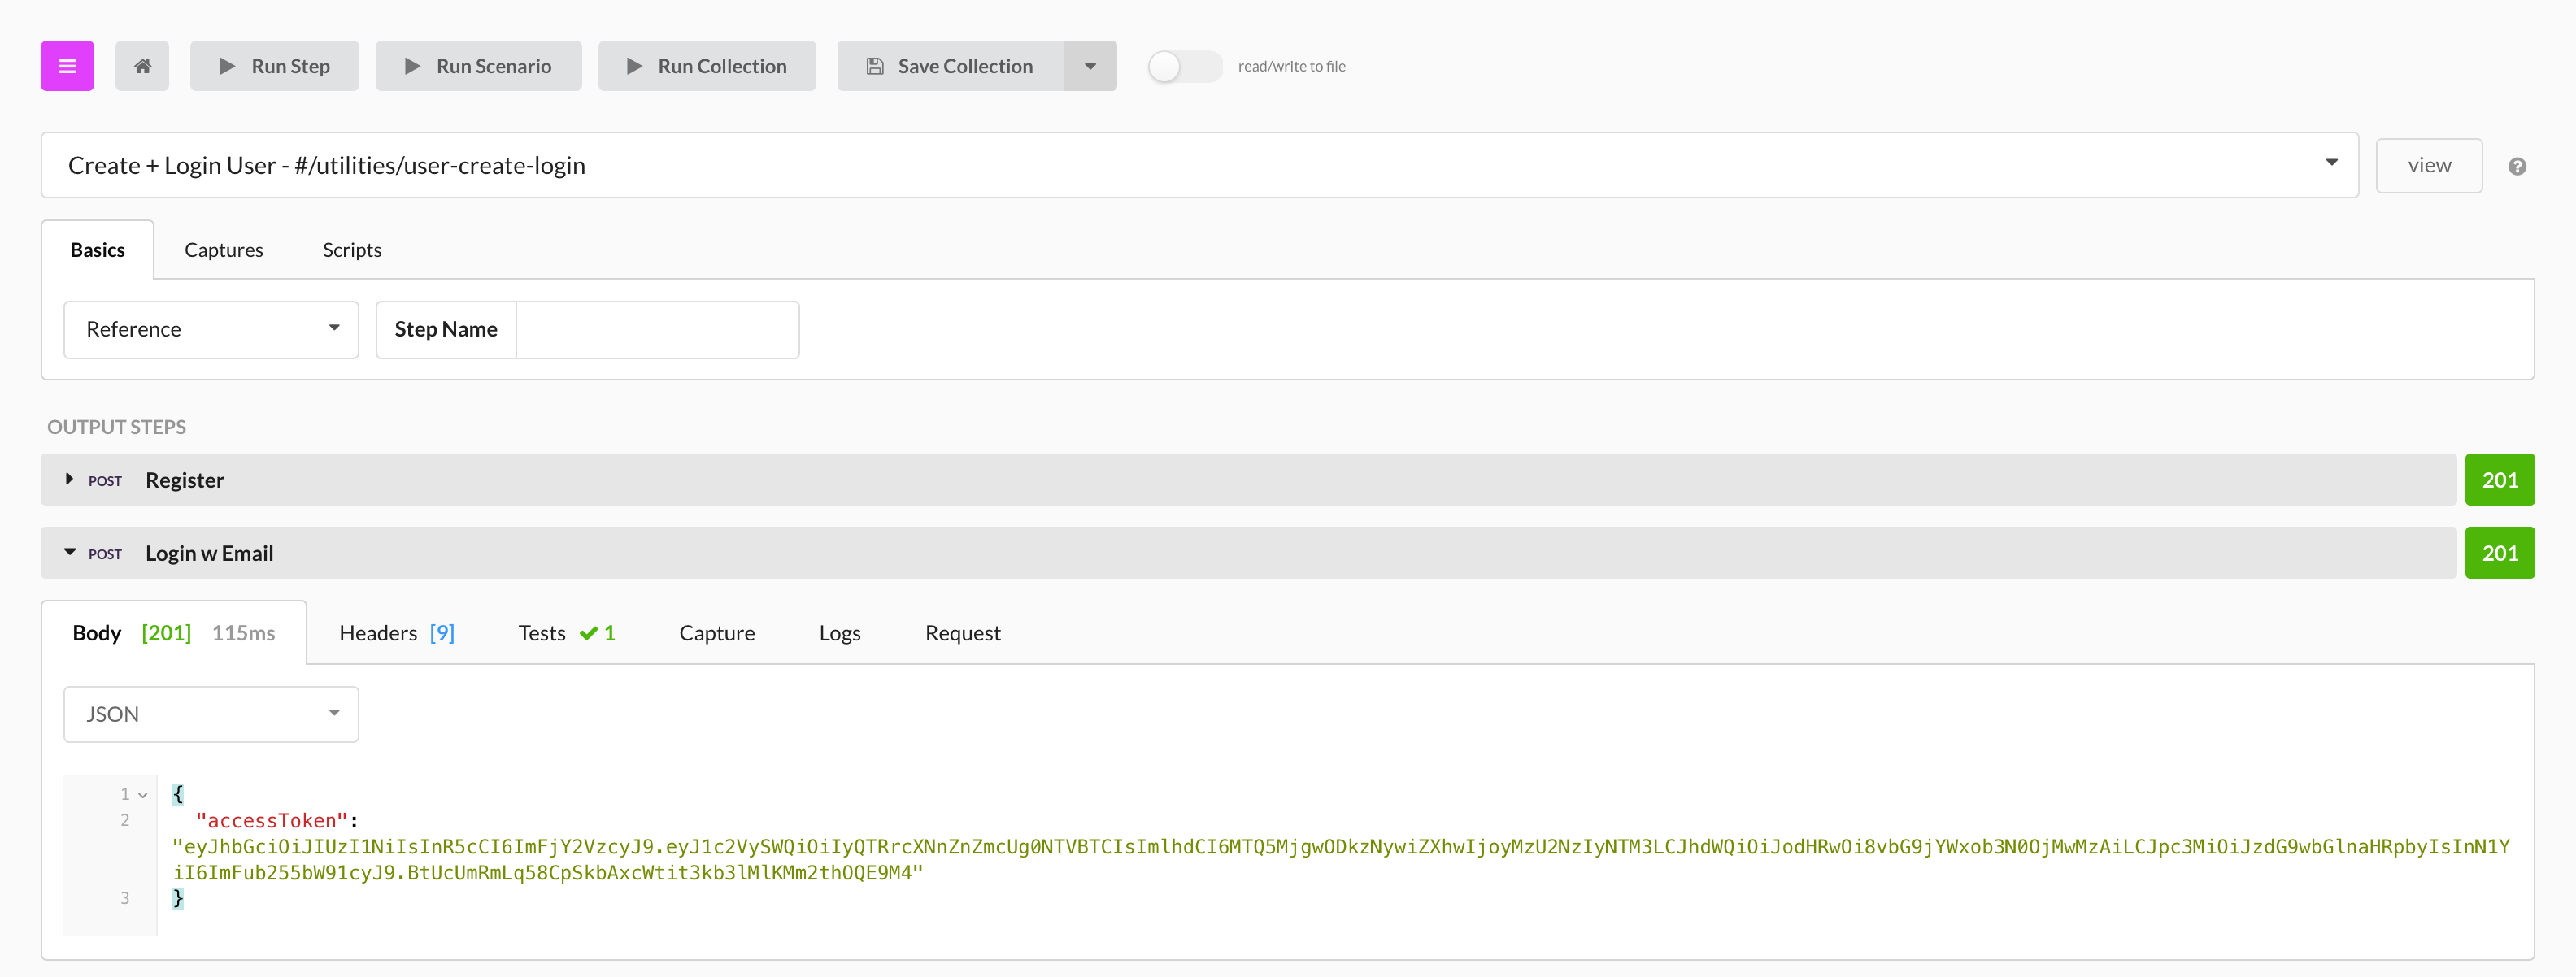
$.ctx values saved in ref steps **ARE** available in subsequent steps. The ref step in the screenshot below saves a $.ctx.accessToken property (not displayed), that the "Create Org" step then uses.
|
||||
|
||||
|
||||
_need to update image_
|
||||
|
||||
### Viewing Reference Output
|
||||
|
||||
When a reference is run as part of a scenario, its output will expand so that you can view the results of each step. In the screenshot below, we are looking at the results of the `Todo: Utility CRUD` scenario pictured above.
|
||||
|
||||
Tests and assertions made in a referenced scenario **will** contribute to the overall pass/fail count of the calling scenario.
|
||||
|
||||
|
||||
_need to update image_
|
||||
|
||||
---
|
||||
|
||||
**Related**
|
||||
|
||||
* [Variables Overview](variables-overview.md)
|
||||
* [Context Variables](variables-context.md)
|
||||
* [Variables Environment](variables-environment.md)
|
||||
|
||||
@@ -1,26 +1,17 @@
|
||||
Stoplight Scenarios is a powerful (but accessible!) tool that takes the pain out of API testing. It's available on [the web](https://next.stoplight.io) and as a [desktop app](https://download-next.stoplight.io).
|
||||
Stoplight Scenarios is a powerful (but accessible!) tool that takes the pain out of API testing. It is a standalone product, available on [the web](https://scenarios.stoplight.io), and as a [desktop app](https://download-next.stoplight.io).
|
||||
|
||||
We generally recommend the desktop app when possible. It works with local servers, behind firewalls, and exchanges information with tools on your computer like Git or your favorite IDE. You can switch seamlessly between the desktop app and the web app.
|
||||
|
||||
We engineered Scenarios from the ground up to be:
|
||||
|
||||
* **Powerful** Easily assert, capture, transform, and validate your API Spec (OpenAPI) against your actual API. And if that isn’t enough, Prism has a powerful javascript runtime.
|
||||
- **Powerful** Easily assert, capture, transform, and validate your API Spec (Swagger) against your actual API. And if that isn’t enough, Prism has a powerful javascript runtime.
|
||||
|
||||
* **Portable** Scenarios are described in plain JSON with a well thought out, robust specification. Use our visual editor to quickly generate and manage this JSON. Scenarios can be run from our visual tooling, or completely outside of Stoplight, on your own machines, or on your continuous integration server.
|
||||
- **Portable** Scenarios are described in plain JSON with a well thought out, robust specification. Use our visual editor to quickly generate and manage this JSON. They can be run from our visual tooling, or completely outside of Stoplight, on your own machines or on your continuous integration server.
|
||||
|
||||
* **Flexible** Your APIs, your tests, your way. Scenarios only test what you want them to. They have no opinion about your architecture (Monolithic vs Microservices), company structure (in house vs distributed), development lifecycle (production vs TDD), and your environment (development vs staging vs production).
|
||||
- **Flexible** Your APIs, your tests, your way. Scenarios only test what you want them to. They have no opinion about your architecture (Monolithic vs Microservices), company structure (in house vs distributed), development lifecycle (production vs TDD), and your environment (development vs staging vs production).
|
||||
|
||||
* **Fast** Time can’t be slowed down, and we can’t give it back to you. Creating tests should be quick, and waiting for you tests to run shouldn’t feel like watching water boil. Scenarios are run concurrently for maximum speed - run hundreds of API requests and test assertions in seconds.
|
||||
- **Fast** Time can’t be slowed down, and we can’t give it back to you. Creating tests should be quick, and waiting for you tests to run shouldn’t feel like watching water boil. Scenarios are run concurrently for maximum speed - run hundreds of API requests and test assertions in seconds.
|
||||
|
||||
### Editor UI Overview
|
||||
|
||||

|
||||
|
||||
---
|
||||
|
||||
**Related**
|
||||
|
||||
* [Prism Introduction](../prism/overview.md)
|
||||
* [Leveraging Open API](levergage-openapi.md)
|
||||
* [Continuous Integration](continuous-integration.md)
|
||||
* [Run Scenarios In Stoplight](run-test-stoplight.md)
|
||||

|
||||
|
||||
Binary file not shown.
|
Before Width: | Height: | Size: 219 KiB |
Binary file not shown.
|
Before Width: | Height: | Size: 202 KiB |
Binary file not shown.
|
Before Width: | Height: | Size: 157 KiB |
Binary file not shown.
|
Before Width: | Height: | Size: 233 KiB |
Binary file not shown.
|
Before Width: | Height: | Size: 443 KiB |
Reference in New Issue
Block a user